In the previous parts of this series, we learned how to create an editable dynamic table, add and remove rows dynamically, and validate input fields and rows. So far, we have been working with the table data in an object array. In this part, we will learn how to read and write table data with API requests using JSON Server and SWR.
- JSON Server is a fake REST API that we can use to test our API requests.
- SWR is a React hook for data fetching that makes it easy to fetch and revalidate data.
Setup and install dependencies
Before we get started, let’s install the dependencies we need for this part.
# Install JSON Server
npm install -g json-server

# Install SWR
npm install swr
For JSON Server to work, we need to create a db.json file. This file will contain the data we want to fetch and update. In our case, it will be the list of students.
Let’s create a new db.json file in the src/Table folder and add the following data
{
  "students": [
    {
      "id": 1,
      "studentNumber": 1111,
      "name": "Bahar Constantia",
      "dateOfBirth": "1984-01-04",
      "major": "Computer Science"
    },
    {
      "id": 2,
      "studentNumber": 2222,
      "name": "Harold Nona",
      "dateOfBirth": "1961-05-10",
      "major": "Communications"
    },
    {
      "id": 3,
      "studentNumber": 3333,
      "name": "Raginolf Arnulf",
      "dateOfBirth": "1991-10-12",
      "major": "Business"
    },
    {
      "id": 4,
      "studentNumber": 4444,
      "name": "Marvyn Wendi",
      "dateOfBirth": "1978-09-24",
      "major": "Psychology"
    }
  ]
}
Notice that we added a new id field to each student object. This field will be used as a unique identifier for JSON Server to update and delete data. We also changed the studentId field to studentNumber to distinguish it from the id field.
To get the JSON Server up and running, we need to run the following command in the terminal.
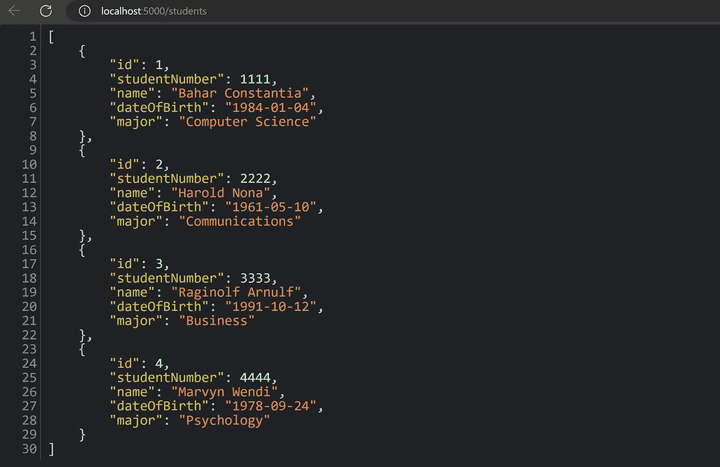
json-server --watch ./src/Table/db.json --port 5000This will run a server on port 5000 and serve the data in the db.json file. We can access the data by visiting http://localhost:5000/students.
An alternative way to running two servers (React and JSON Server) separately in two terminals is to use Concurrently. It’s a package that allows us to run multiple commands concurrently.
First, let’s install the package.
npm install concurrentlyThen, we need to add a new script to the package.json file to enable us to run both servers concurrently.
"scripts": {
  "vite": "vite",
  "jsonserver": "json-server ./src/Table/db.json --watch --port 5000",
  "dev": "concurrently \"npm run jsonserver\" \"npm run vite\"",
  ...
}
Now, when running the project normally using npm run dev, both servers will run simultaneously.
Fetch data using SWR
Now that we have the JSON Server running let’s start working with the API requests.
Before we start, we need to make a few changes to accommodate the new data structure.
- The
Studenttype interface indata.tsmust be updated to match the data in thedb.jsonfile.
export type Student = {
  id: number
  studentNumber: number
  name: string
  dateOfBirth: string
  major: string
}- Since the data is now stored in a JSON file, we don’t require the
dataobject array indata.tsanymore. We only need theStudenttype interface. To make the code cleaner, let’s move theStudenttype to a newtypes.tsfile in the “Table” folder. So now the/datareference in theTablecomponent will be changed to/types.
import { Student } from './types';- The
columnsarray incolumns.tsneeds to be updated to match the newStudenttype interface
...
import { Student } from './types';
...
export const columns = [
  columnHelper.accessor('studentNumber', {
    header: 'Student Id',
    cell: TableCell,
    meta: {
      type: 'number',
    },
  }),
  ...
]
We’re all set with the changes. Let’s start fetching the data.
First, we will create a new useStudents hook. This hook will be responsible for fetching the data and other operations related to the students using the useSWR.
Here are few things to note:
- When using
useSWRhook, it accepts two parameters. The first parameter is the URL that will be used to fetch the data. In our case, it will behttp://localhost:5000/students. The second parameter is thegetRequestfunction that will be used to fetch the data. - The
useStudentshook will expose the student’sdataarray,isValidatingvariable to the component that uses it.isValidatingwill be used to know if the data is being fetched. It’s similar toisLoading, but it’s triggered on mutations as well.
import useSWR from 'swr';

const url = 'http://localhost:5000/students';

async function getRequest() {
  const response = await fetch(url);
  return response.json();
}

export default function useStudents() {
  const { data, isValidating } = useSWR(url, getRequest);

  return {
    data: data ?? [],
    isValidating,
  };
}
Then, we will use the useStudents hook in the Table component to fetch the data, replacing the originalData array we had in the previous parts.
A quick recap, the originalData array is the array that contains the original data and is used to initialize the data array. The reason we had to do this is because we need to keep the previous data in case the user cancels the changes. Now, since the originalData is coming from the server, we can remove the one we had before.
import { useEffect, useState } from "react";
...
import useStudents from "./useStudents";

export const Table = () => {
 const { data: originalData, isValidating } = useStudents();
 const [data, setData] = useState<Student[]>([]);
 const [editedRows, setEditedRows] = useState({});
 const [validRows, setValidRows] = useState({});

 useEffect(() => {
   if (isValidating) return;
   setData([...originalData]);
 }, [isValidating]);

 ...
};
And since we don’t know when the data will be ready, we had to add a useEffect hook to update the data array when the originalData changes. That’s when the isValidating variable comes in handy. It will be true when the data is being fetched and false when it is ready.
Of course, we can always add a loading indicator to improve the user experience, but this is out of the scope of this tutorial.
Now, if we run the project and open the browser network tab, we will see that the data is being fetched from the server.
Note: Other parts of the code might be borken at this point, this is expected and will be fixed in the next steps. We can always comment out the errors if it’s stopping us from running the project.
Update data
Updating a table row requires a new PUT request to the server with few additional steps:
- The update function requires two parameters. The first parameter is the
idof the row that will be updated. The second parameter is row data that needs to be updated. - We need to expose the update function from the
useStudentshook so theTablecomponent can use it. - After updating the data, we need to trigger a
mutatefunction to update theoriginalDataarray. Themutateis a built-in function in SWR that allows us to sync and revalidate the data.
import useSWR, { mutate } from 'swr';
import { Student } from './types';

const url = 'http://localhost:5000/students';

async function updateRequest(id: number, data: Student) {
  const response = await fetch(`${url}/${id}`, {
    method: 'PUT',
    headers: {
      'Content-Type': 'application/json',
    },
    body: JSON.stringify(data),
  });
  return response.json();
}

async function getRequest() {
  const response = await fetch(url);
  return response.json();
}

export default function useStudents() {
  const { data, isValidating } = useSWR(url, getRequest);

  const updateRow = async (id: number, postData: Student) => {
    await updateRequest(id, postData);
    mutate(url);
  };

  return {
    data: data ?? [],
    isValidating,
    updateRow
  };
}
In the Table compoennt, we have two functions that updates the data. The first one is the updateData that is triggered on cell input change, and it updates the data array at the specified row index. The second is the revertData, which is triggered when the user clicks the cancel/save button, and it either reverts the changes or keeps them and updates the originalData. Here is the current code we have from the previous parts.
const table = useReactTable({
  ...
  revertData: (rowIndex: number, revert: boolean) => {
        if (revert) {
          setData((old) =>
            old.map((row, index) =>
              index === rowIndex ? originalData[rowIndex] : row
            )
          );
        } else {
          setOriginalData((old) =>
            old.map((row, index) => (index === rowIndex ? data[rowIndex] : row))
          );
        }
      },
    ...
  }
)
Now, since we need to update the data on the server, we will change the code above and create a separate function called updateRow that will trigger the updateRow function from the useStudents hook.
...
export const Table = () => {
  const { data: originalData, isValidating, updateRow } = useStudents();
  ...
  const table = useReactTable({
    ...
    revertData: (rowIndex: number) => {
      setData((old) =>
        old.map((row, index) =>
          index === rowIndex ? originalData[rowIndex] : row
        )
      );
    },
    updateRow: (rowIndex: number) => {
      updateRow(data[rowIndex].id, data[rowIndex]);
    },
    ...
  })
}
Notice that the setOriginalData function is no longer needed since we are updating the data on the server, which in return will automatically update the originalData array.
Lastly, in the EditCell component, we need to update the setEditedRows to include the updateRow function for the save button.
...
export const EditCell = ({ row, table }) => {
  ...
  const setEditedRows = (e: MouseEvent<HTMLButtonElement>) => {
    const elName = e.currentTarget.name;
    meta?.setEditedRows((old: []) => ({
      ...old,
      [row.id]: !old[row.id],
    }));
    if (elName !== "edit") {
      e.currentTarget.name === "cancel" ? meta?.revertData(row.index) : meta?.updateRow(row.index);
    }
  };
 ...
};
Below is a video of the update process with the network tab open to demonstrate the API request.
Create data
Adding a new row is similar to the updating approach except that the API request will be a POST method.
Let’s create two functions, one for the API request and the other for the hook that will be used in the Table component.
import useSWR, { mutate } from 'swr';
import { Student } from './types';

const url = 'http://localhost:5000/students';

async function updateRequest(id: number, data: Student) {
  const response = await fetch(`${url}/${id}`, {
    method: 'PUT',
    headers: {
      'Content-Type': 'application/json',
    },
    body: JSON.stringify(data),
  });
  return response.json();
}

async function addRequest(data: Student) {
  const response = await fetch(url, {
    method: 'POST',
    headers: {
      'Content-Type': 'application/json',
    },
    body: JSON.stringify(data),
  });
  return response.json();
}

async function getRequest() {
  const response = await fetch(url);
  return response.json();
}

export default function useStudents() {
  const { data, isValidating } = useSWR(url, getRequest);

  const updateRow = async (id: number, postData: Student) => {
    await updateRequest(id, postData);
    mutate(url);
  };

  const addRow = async (postData: Student) => {
    await addRequest(postData);
    mutate(url);
  };

  return {
    data: data ?? [],
    isValidating,
    addRow,
    updateRow
  };
}
Previously, in the Table component, we used to update both data and originalData with newly added rows.
const table = useReactTable({
  ...
  addRow: () => {
  const newRow: Student = {
    studentId: Math.floor(Math.random() * 10000),
    name: "",
    dateOfBirth: "",
    major: "",
  };
  const setFunc = (old: Student[]) => [...old, newRow];
    setData(setFunc);
    setOriginalData(setFunc);
  },
 ...
})
Now, since we are adding the data to the server, we only need to trigger the addRow function from the useStudents hook. We don’t need any of the set functions anymore because after the adding request, the mutate function will update the originalData array and consequently, the useEffect hook will update the data array.
...
export const Table = () => {
  const { data: originalData, isValidating, addRow, updateRow } = useStudents();
  ...
  const table = useReactTable({
    ...
    addRow: () => {
      const id = Math.floor(Math.random() * 10000);
      const newRow: Student = {
        id,
        studentNumber: id,
        name: "",
        dateOfBirth: "",
        major: ""
      };
      addRow(newRow);
    },
    ...
  })
  ...
}
Additionally, we added an id field to the newRow object. Below is a video of the add process with the network tab open to demonstrate the API request.
Delete data
At this point, we have the useStudents hook responsible for fetching, updating, and adding data. The last thing we need to do is to add the delete functionality.
Let’s create a new function called deleteRequest that will be responsible for the API request and then add it to the useStudents hook.
import useSWR, { mutate } from 'swr';
import { Student } from './types';

const url = 'http://localhost:5000/students';

async function updateRequest(id: number, data: Student) {
  const response = await fetch(`${url}/${id}`, {
    method: 'PUT',
    headers: {
      'Content-Type': 'application/json',
    },
    body: JSON.stringify(data),
  });
  return response.json();
}

async function addRequest(data: Student) {
  const response = await fetch(url, {
    method: 'POST',
    headers: {
      'Content-Type': 'application/json',
    },
    body: JSON.stringify(data),
  });
  return response.json();
}

async function deleteRequest(id: number) {
  const response = await fetch(`${url}/${id}`, {
    method: 'DELETE',
    headers: {
      'Content-Type': 'application/json',
    }
  });
  return response.json();
}

async function getRequest() {
  const response = await fetch(url);
  return response.json();
}

export default function useStudents() {
  const { data, isValidating } = useSWR(url, getRequest);

  const updateRow = async (id: number, postData: Student) => {
    await updateRequest(id, postData);
    mutate(url);
  };

  const deleteRow = async (id: number) => {
    await deleteRequest(id);
    mutate(url);
  };

  const addRow = async (postData: Student) => {
    await addRequest(postData);
    mutate(url);
  };

  return {
    data: data ?? [],
    isValidating,
    addRow,
    updateRow,
    deleteRow
  };
}
Then, in the Table component, similar to the previous step, we’re removing the set functions and triggering the deleteRow function from the useStudents hook.
...
export const Table = () => {
  const { data: originalData, isValidating, addRow, updateRow, deleteRow } = useStudents();
  ...
  const table = useReactTable({
    ...
    removeRow: (rowIndex: number) => {
      deleteRow(data[rowIndex].id);
    },
    ...
  })
  ...
}
Lastly, since we enabled removing multiple rows in the previous part, we need to update the removeSelectedRows function to loop through each row and trigger the deleteRow function.
...
export const Table = () => {
  const { data: originalData, isValidating, addRow, updateRow, deleteRow } = useStudents();
  ...
  const table = useReactTable({
    ...
    removeRow: (rowIndex: number) => {
      deleteRow(data[rowIndex].id);
    },
    removeSelectedRows: (selectedRows: number[]) => {
      selectedRows.forEach((rowIndex) => {
        deleteRow(data[rowIndex].id);
      });
    },
    ...
  })
  ...
}
Below is a video of the delete process with the network tab open to demonstrate the API request.
Complete code
The complete code is available in this repository. If you liked the tutorial, please star the repository, and feel free to request new features!
Summary
In this part, we learned how to read and write table data with API requests using React Tanstack. We used JSON Server to create a fake REST API and SWR to fetch and revalidate data. We also learned how to update, add, and delete data from the server.
Bye for now 👋


